The bride’s morning gets three hours, a stylist and a room full of people. The groom’s gets twenty minutes and a hotel mirror. That is usually fine — until the bow tie comes out of the box at 2:40 for a 3:00 ceremony and nobody in the room knows how to tie a bow tie. We have watched it happen at enough Long Island weddings to know exactly how the next ten minutes go.
I’m Jose Serrano, founder of JS Visions Photography and Cinematography. Over 25 years photographing weddings across Nassau County, Suffolk County and New York City has taught me that the groom’s twenty minutes decide whether the getting-ready photographs are calm or frantic — and it almost always comes down to three small things nobody rehearsed.
So here is the practical version: how to tie a bow tie, the three necktie knots actually worth knowing, and the pocket square folds that hold their shape through a full reception. Written from behind the camera, by people who have fixed every one of these at the last minute.
The short answer
- Bow tie: set the adjustable band to your collar size, then cross, loop, fold, and pull the two folded ends. It should look slightly uneven — a perfectly symmetrical bow reads as a clip-on.
- Necktie: tie a half Windsor, pinch a dimple below the knot, and let the tip reach the middle of your belt buckle.
- Pocket square: linen takes a flat or pointed fold, silk wants a puff. Show a quarter to half an inch, and do not match your tie exactly.
- Timing: practice the bow tie a week out, and be fully dressed 45 minutes before you leave for the ceremony.
How to tie a bow tie, step by step
A self-tie bow tie takes about fifteen minutes to learn and roughly four attempts to learn properly. Do that on a Tuesday, not on your wedding day.
Before you start, set the adjustable band to your collar size. If you wear a 16″ shirt, set it to 16. A bow tie tied on a loose band will slide sideways every time you turn your head, and it will be crooked in every photograph taken after the ceremony.
- Pop your shirt collar up and drape the tie around your neck, with one end hanging about an inch and a half lower than the other.
- Cross the long end over the short end, then bring it up through the loop at your neck and pull it snug. Let it hang forward, out of the way.
- Take the short end and fold it into a bow — bring the two widest points together so it forms a flat bow shape. Hold it horizontally against your collar button. This is the front half of the finished bow.
- Drop the long end straight down over the middle of that bow.
- Pinch the front bow, then push the long end up behind it and fold it forward over your fingers. That fold is the back half of the bow.
- Push that folded end through the loop sitting behind the front bow. It is tight and it will feel wrong. Keep going.
- Pull gently on the two folded ends — not the flat ones — to tighten the knot.
- Straighten it by tugging opposite ends in pairs: top-left with bottom-right, then the other two. Work the knot until it sits centered.
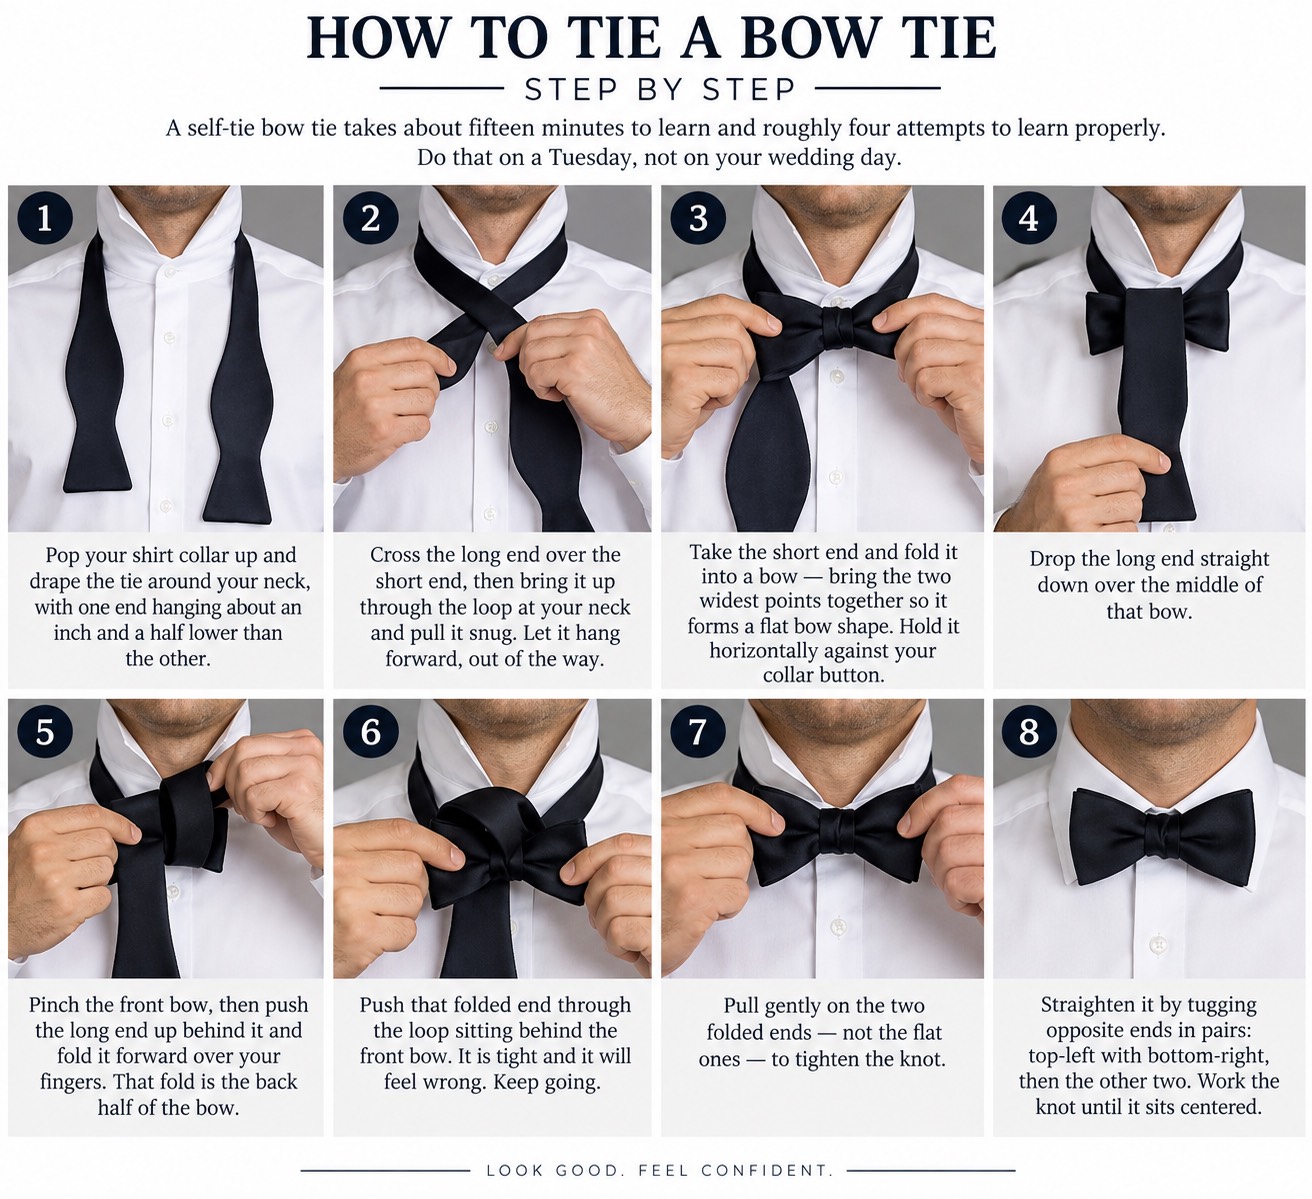
Here is the part nobody tells you: a hand-tied bow tie is not supposed to be symmetrical. It should sit slightly uneven, with a little texture in the knot. If yours looks machine-perfect, it looks like a clip-on — and on camera, a clip-on always reads as a clip-on.
Self-tie or pre-tied?
Self-tie, if you have a week to practice. The knot has depth and a little asymmetry that a pre-tied bow cannot fake, and it photographs better in close-up.
If you are going to be honest with yourself and admit you will not practice, buy a good pre-tied bow tie in a quality silk rather than fighting a self-tie in a bathroom fifteen minutes before your ceremony. A calm groom in a pre-tied bow beats a stressed groom in a crooked self-tie, every time.
The three necktie knots worth knowing
There are dozens. You need three, and honestly you need one. Most Long Island grooms we photograph wear a necktie rather than a bow tie, and the knot is the difference between a suit that fits and a suit that looks borrowed.
Four-in-hand
The narrow, slightly slanted knot. It is the smallest of the three and the only one that is meant to look a little off-kilter. Best with point or button-down collars, thicker wool and knit ties, and on taller grooms — it uses the least length, so the tie still reaches your waistband.
Half Windsor
The default, and the one we would put on nine grooms out of ten. A neat, symmetrical triangle that is substantial without being oversized, and it works with almost any collar and almost any tie fabric. If you learn one knot for your wedding, learn this one.
Full Windsor
The wide, formal triangle. It fills out a spread or cutaway collar beautifully — and it swallows four to five extra inches of tie. If you are over six feet, or the tie is on the short side, you will finish with the tip sitting up near your sternum. Check the length before you commit to it on the day.
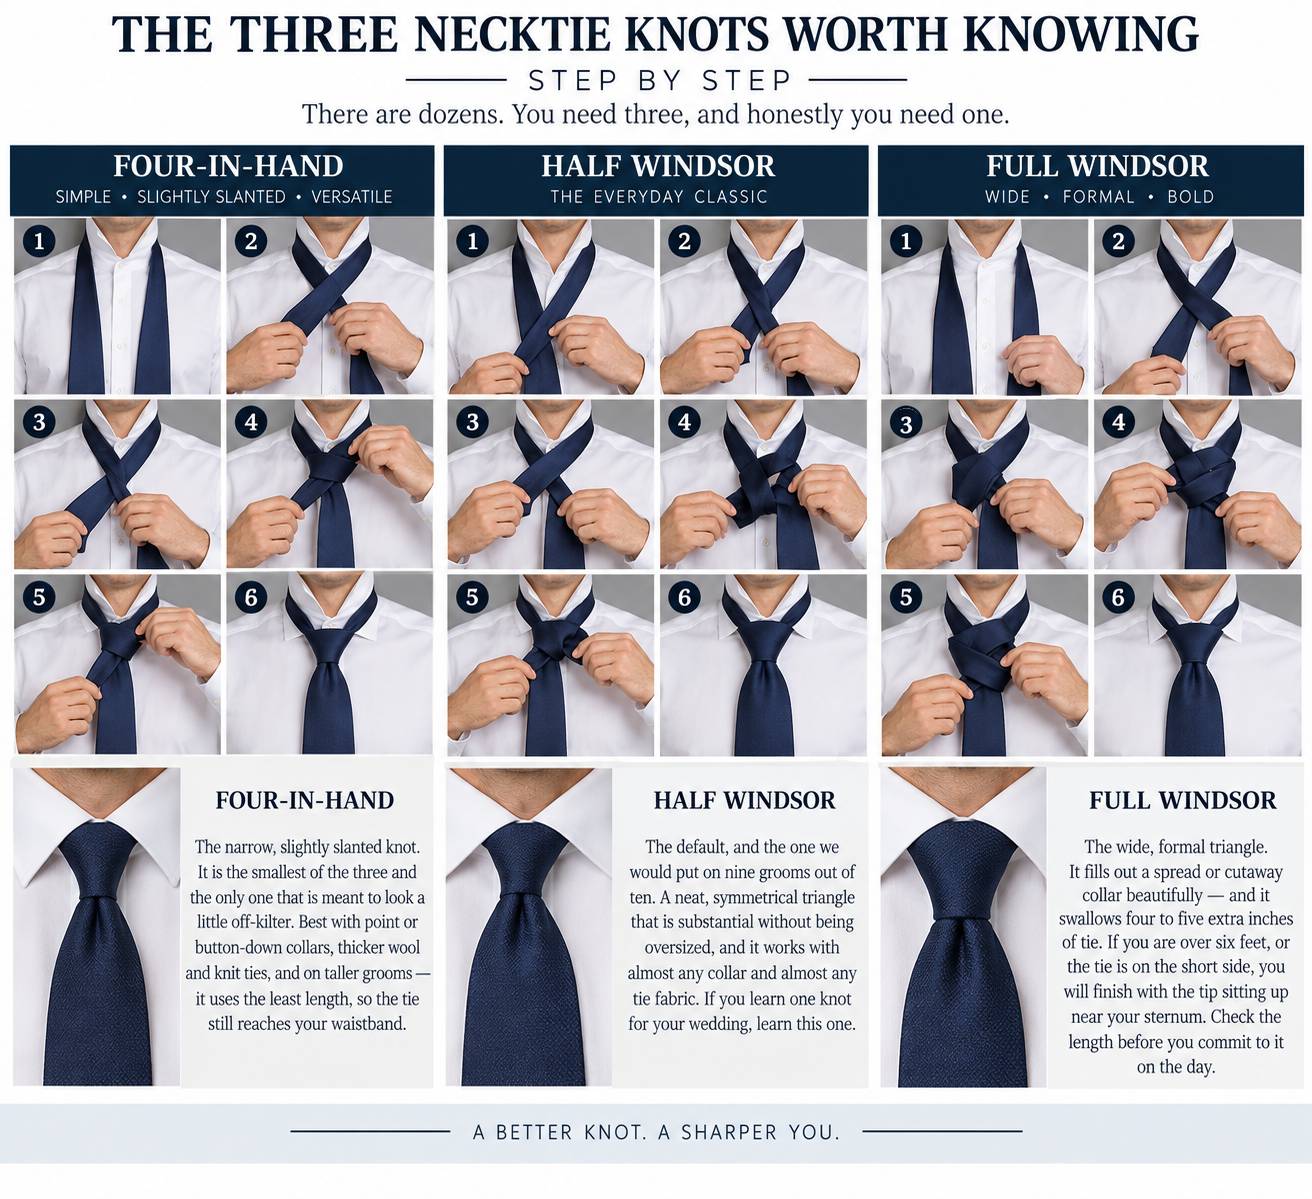
Whichever you tie, four details separate a groom from a teenager at a school dance:
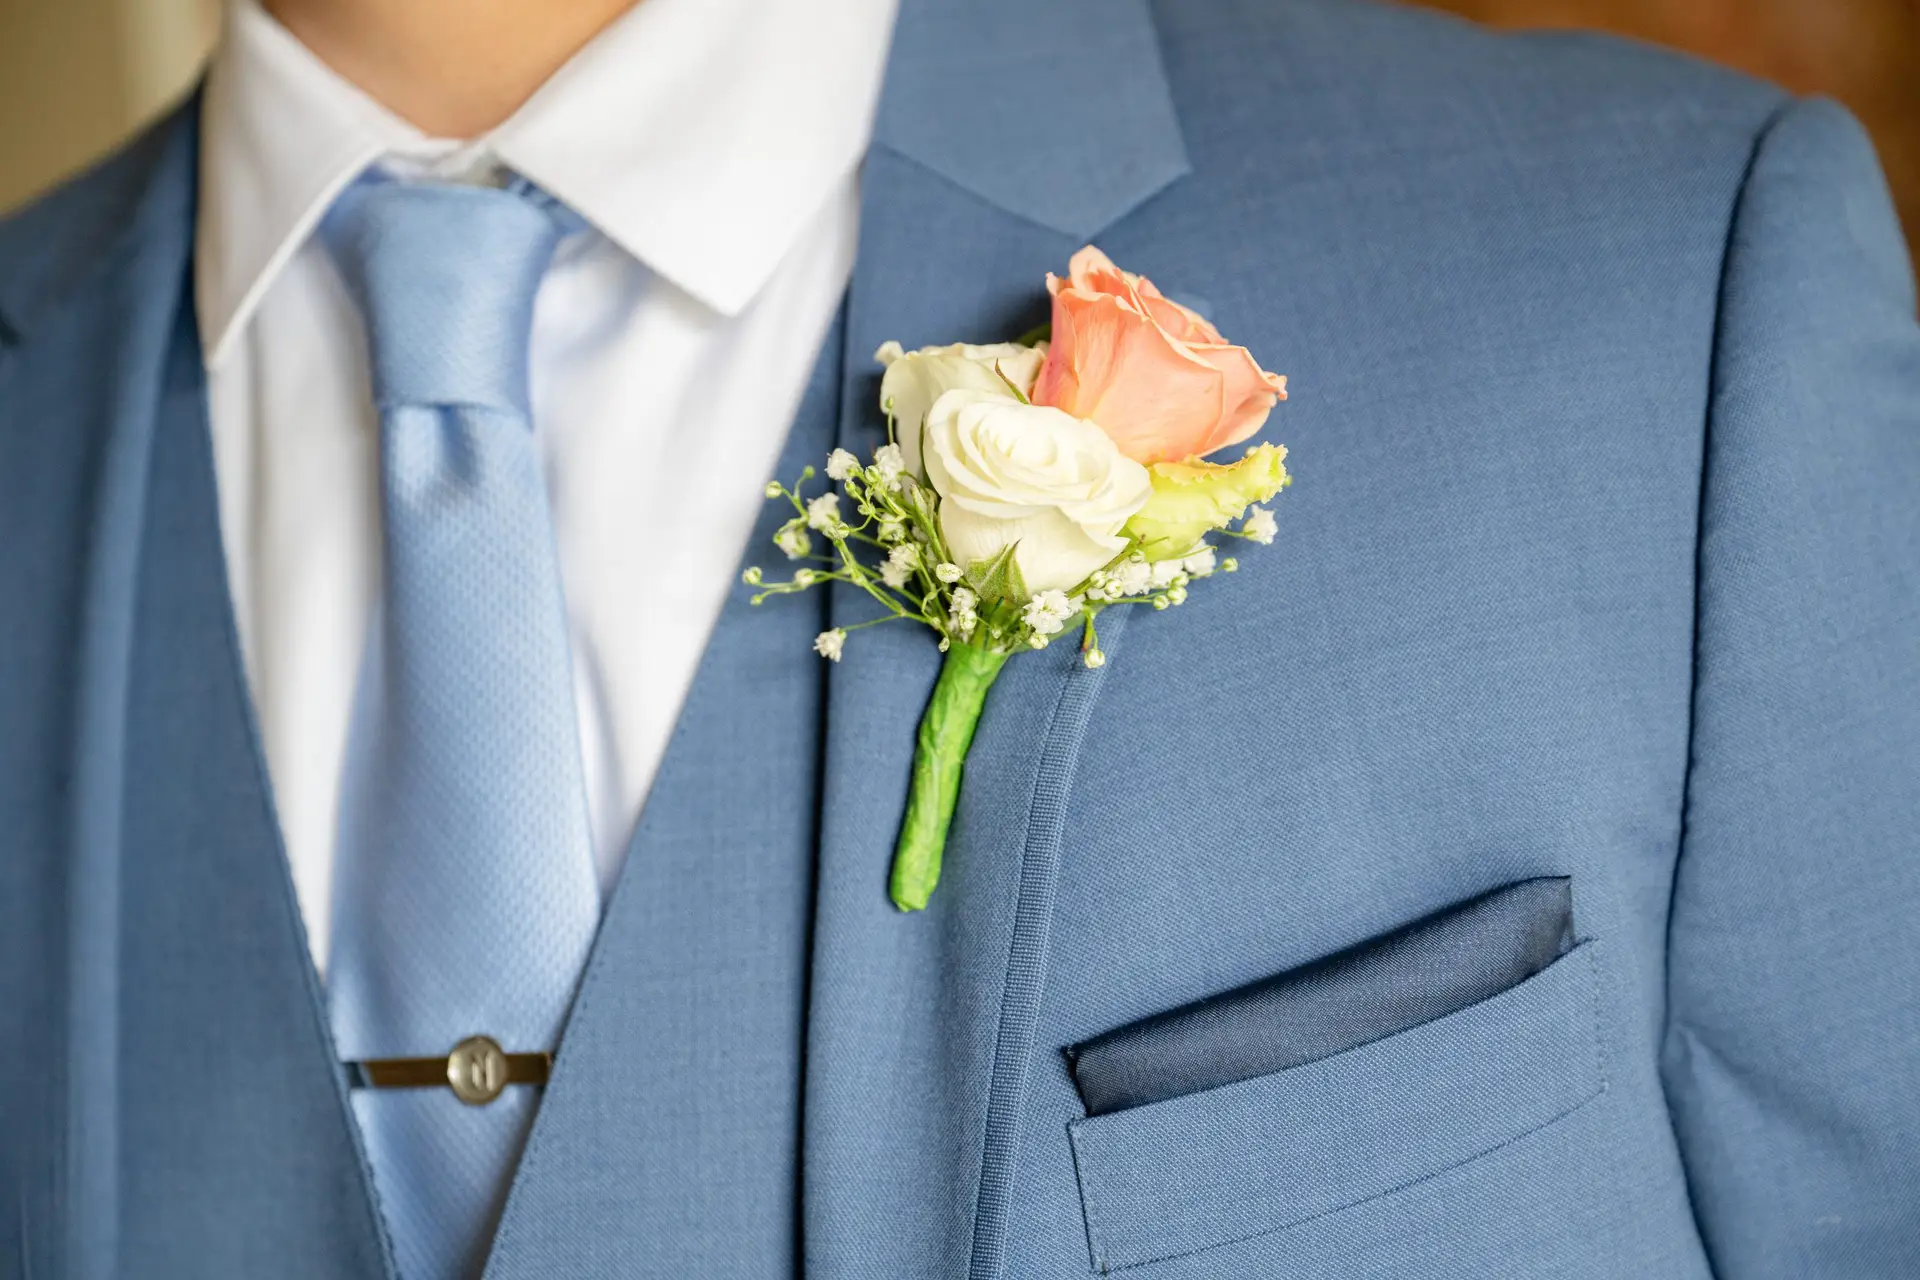
- The dimple. Pinch the fabric just below the knot as you tighten so it forms a single crease down the center. It catches light and gives the tie shape. Without it, the tie photographs flat.
- The length. The tip of the tie should hit the middle of your belt buckle or waistband. Not above it, not over it.
- The keeper loop. The back blade goes through the loop on the label. All day.
- The tie bar. Between the third and fourth shirt buttons, clipping the tie and the shirt placket, and never wider than the tie itself. It keeps the tie from swinging into frame during the first dance.
Pocket square folds that survive a reception
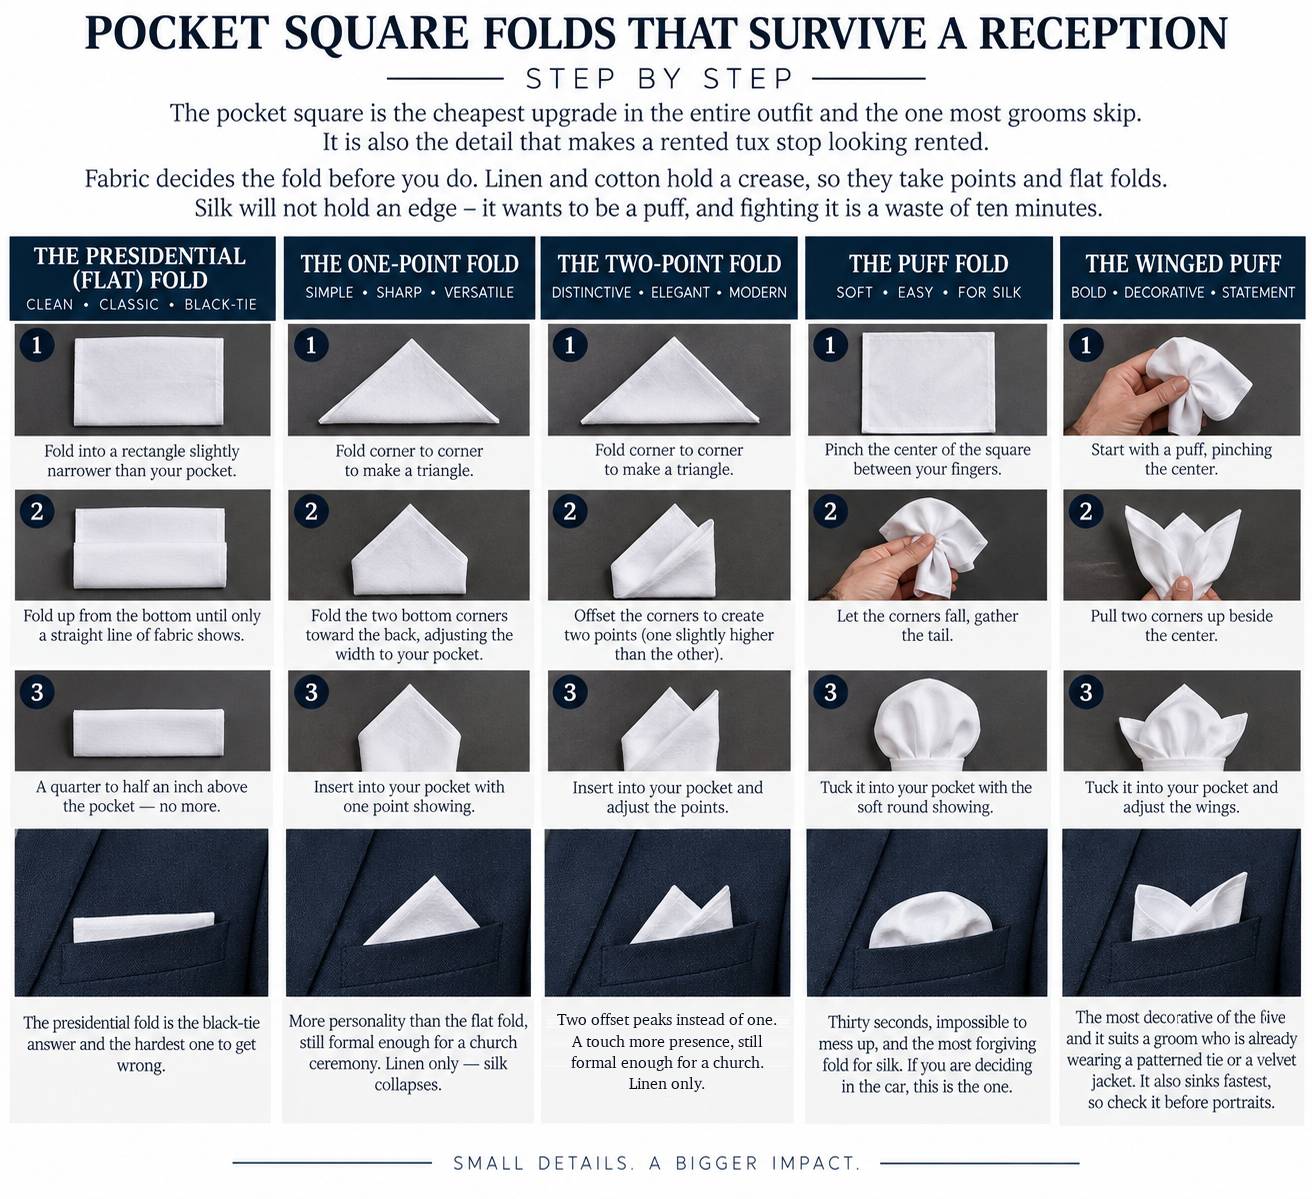
The pocket square is the cheapest upgrade in the entire outfit and the one most grooms skip. It is also the detail that makes a rented tux stop looking rented.
Fabric decides the fold before you do. Linen and cotton hold a crease, so they take points and flat folds. Silk will not hold an edge — it wants to be a puff, and fighting it is a waste of ten minutes.
The presidential (flat) fold
Fold into a rectangle slightly narrower than your pocket, then fold up from the bottom until only a straight line of fabric shows. A quarter to half an inch above the pocket — no more. This is the black-tie answer and the hardest one to get wrong.
The one-point and two-point folds
Fold corner to corner for a single peak, or offset the corners for two. More personality than the flat fold, still formal enough for a church ceremony. Linen only — silk collapses.
The puff fold
Pinch the center of the square, let the corners fall, gather the tail and tuck it in with the soft round showing. Thirty seconds, impossible to mess up, and the most forgiving fold for silk. If you are deciding in the car, this is the one.
The winged puff
A puff with two points pulled up beside it. It is the most decorative of the four and it suits a groom who is already wearing a patterned tie or a velvet jacket. It also sinks fastest, so check it before portraits.
Two rules we would apply to all of them. Do not match the pocket square to the tie exactly. A matched set reads as a rental package on camera — pull a color from the bridesmaid dresses or the bouquet instead and let it relate rather than match. And secure it: a folded square slowly sinks into the pocket over four hours. A small piece of tissue underneath, or a cheap pocket square holder, keeps it sitting where you put it through the last dance.
Should the groomsmen match you?
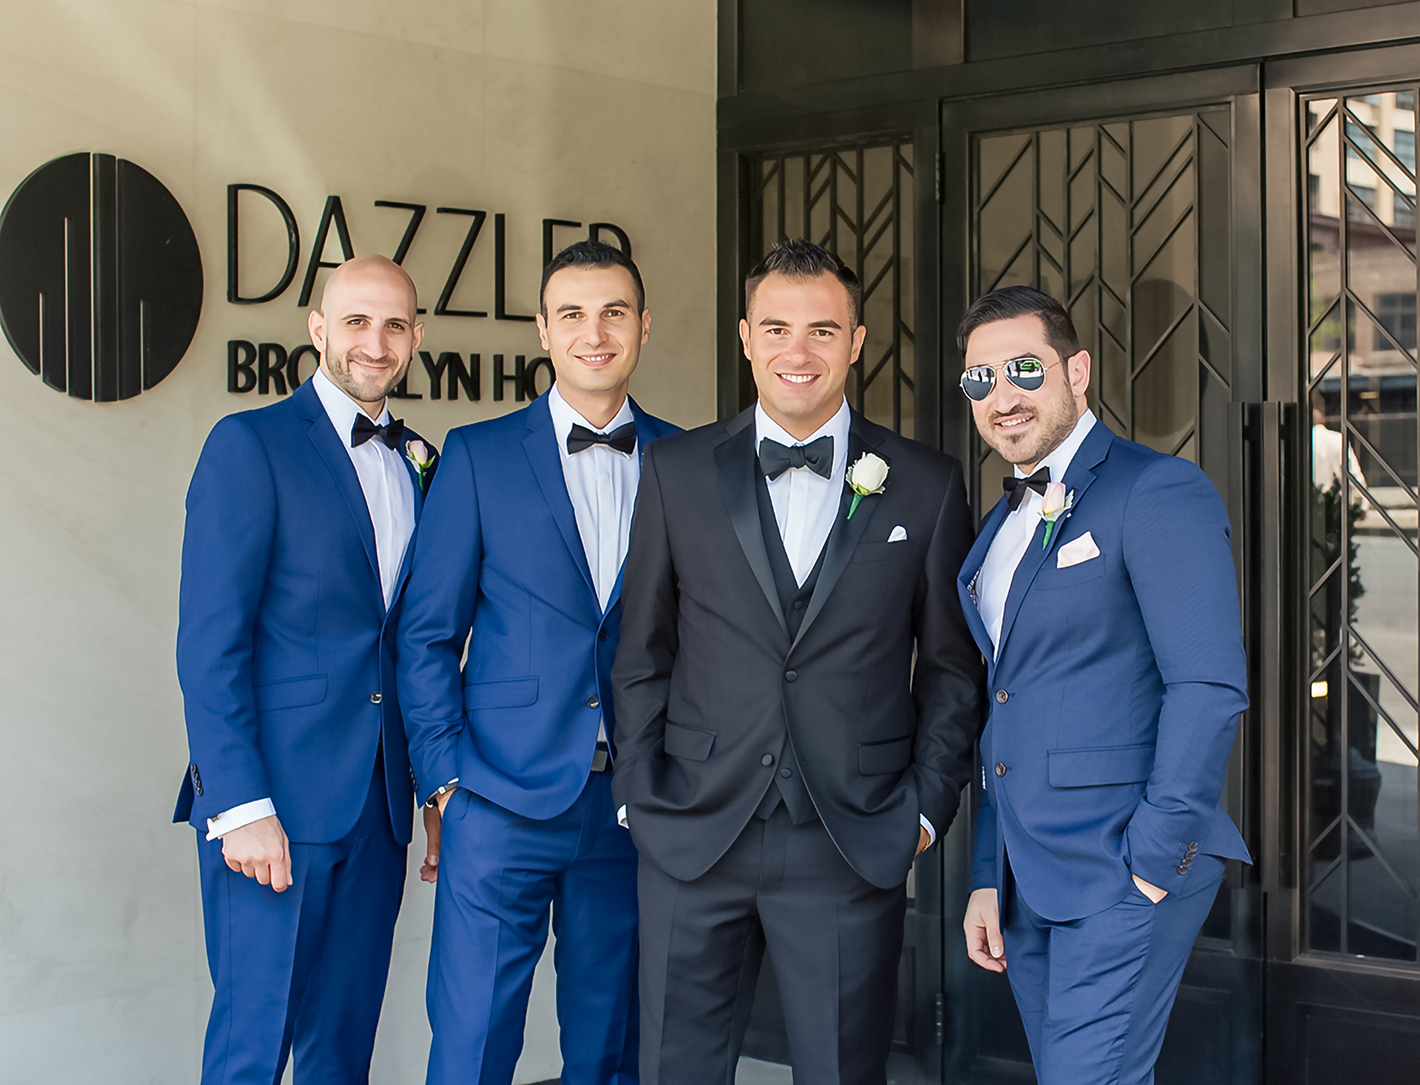
No. They should relate to you.
The simplest version that always works: put your groomsmen in one color and yourself in another, or keep the suits identical and change your tie. A black tuxedo among navy suits, or a white bow tie against the groomsmen’s black — something that lets anyone looking at the photograph find the groom in half a second.
If everyone wears the identical suit, identical tie and identical square, we spend the group portraits looking for the boutonniere to tell you apart. So does everybody who opens the album in twenty years.
What we would ask you to do the week before
None of this is about clothes, really. It is about the twenty minutes before the ceremony being calm enough to photograph. Whether you are getting ready in a hotel suite in Garden City, a family house in Suffolk County or a room at your venue, the list is the same.
- Practice the tie twice. Not the night before. Four attempts on a Tuesday, and it is muscle memory by Saturday.
- Steam everything the night before — shirt, jacket, tie, square. A steamer costs less than one print and creases show in every close-up.
- Put the small things in one box. Rings, cufflinks, watch, tie, pocket square, boutonniere, cologne, shoes, the invitation, your vows. Hand it to us when we arrive and we will build the detail images in ten minutes instead of hunting through three rooms for a cufflink.
- Bring a spare pocket square. They get sat on, spilled on and lent to a crying mother-in-law. Ours have been used for all three.
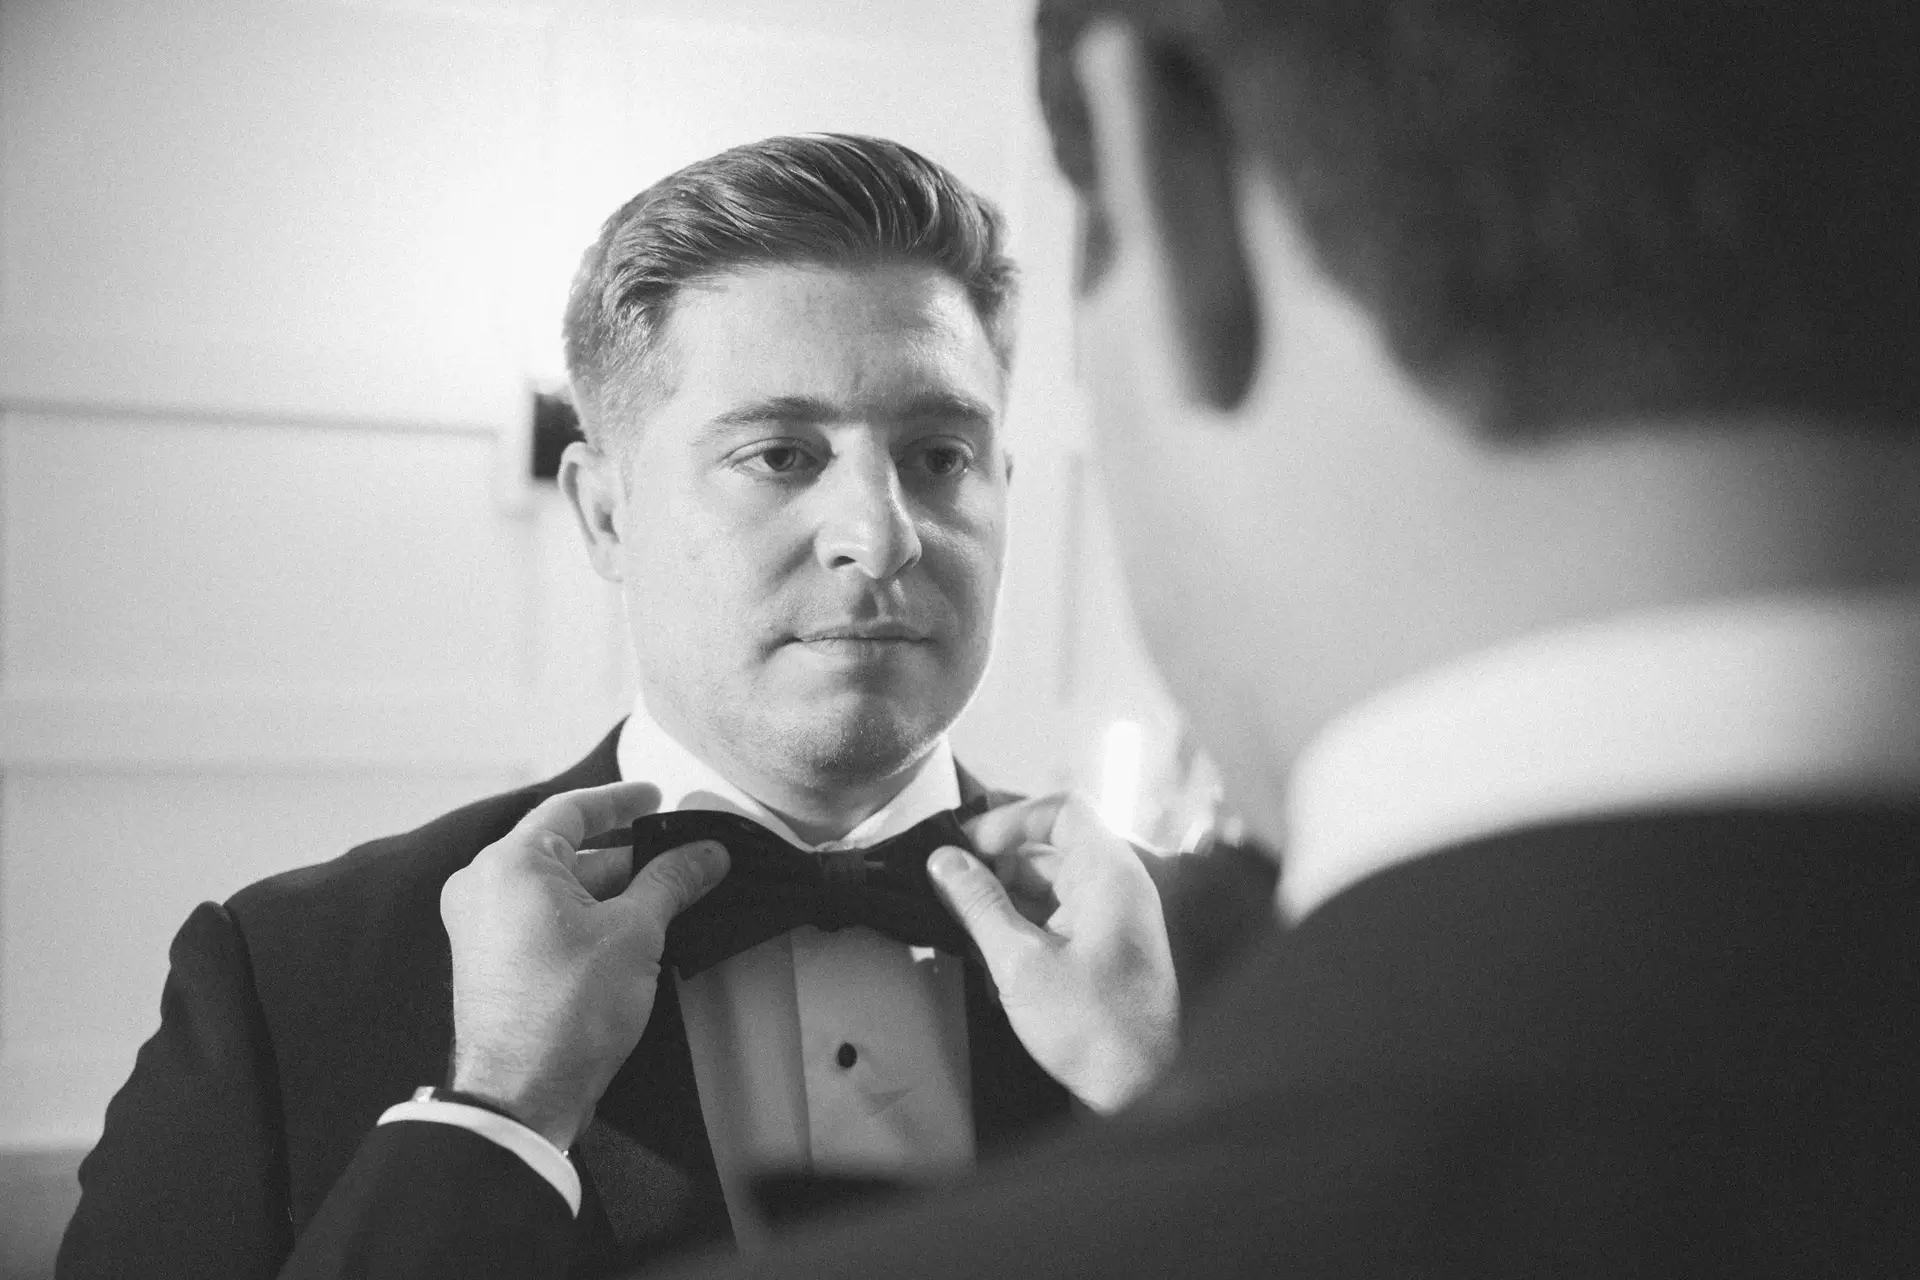
- Leave fifteen minutes of air between “dressed” and “leaving.” That buffer is where the best getting-ready photographs live — your father straightening your collar, your best man laughing at your third attempt at the bow tie. Rush it and those frames simply do not exist.
One technical note, since it changes what you will see in your gallery: a black tie on a black tuxedo has almost no separation on camera. What saves it is texture — a grosgrain or textured silk tie against a smooth lapel reads beautifully, while flat black on flat black goes to a single dark shape. It is worth thirty seconds of thought when you are choosing, and it is the kind of detail we plan lighting around in our documentary approach to the getting-ready hour.
Questions grooms ask
How long does it take to learn to tie a bow tie?
About fifteen minutes to get one tied, and roughly four attempts before it looks right. Practice it standing at a mirror with your collar up, the same way you will do it on the day. Most grooms have it comfortably by the third or fourth try, which is why we suggest practicing a week out rather than the night before.
Should a groom wear a self-tie or pre-tied bow tie?
Self-tie looks better in photographs — the knot has depth and a slight asymmetry a pre-tied bow cannot reproduce. But a good pre-tied bow tie in quality silk beats a crooked self-tie knotted in a panic. If you will genuinely practice, go self-tie. If you know you will not, buy a good pre-tied one and spend that time elsewhere.
What necktie knot should a groom use on his wedding day?
The half Windsor for most grooms. It is symmetrical, substantial without being oversized, and it works with nearly every collar and tie fabric. Use a four-in-hand with a thicker tie, a button-down collar, or if you are tall and need the extra length. Save the full Windsor for a spread collar, and check the tie length first — it uses four to five more inches than a half Windsor.
Should the pocket square match the tie?
It should complement the tie, not match it. An exact match reads as a rental set in photographs. Pull a color from the bridesmaid dresses, the bouquet or the boutonniere instead. For black tie, a white linen square in a flat presidential fold is the classic answer and never looks wrong.
How far should a pocket square stick out?
A quarter to half an inch above the pocket for a flat fold, and roughly the same for a puff. Anything more competes with the boutonniere. Because folded squares sink over the course of a reception, tuck a small piece of tissue underneath or use an inexpensive pocket square holder so it stays put through dinner and dancing.
When should the groom get dressed on the wedding day?
Fully dressed about forty-five minutes before you need to leave for the ceremony, with the tie going on last. That leaves room for detail photographs, portraits with your groomsmen, and the fifteen minutes of unhurried time where the best candid frames of the morning happen. Our full breakdown of the day is in our wedding day timeline and logistics guide.
The short version
Set the band to your collar size. Practice the bow tie on a Tuesday. Tie a half Windsor, pinch a dimple into it, and let the tip reach your belt buckle. Put a white linen square in your pocket that does not match your tie, and give yourself fifteen minutes you do not need.
Do that and the getting-ready photographs take care of themselves. You can see how the morning looks when it is unhurried in our wedding gallery, and if you are still comparing teams, we have answered the questions couples actually ask before booking.
When you are ready to talk about your date, get in touch — we are a Long Island wedding photography and cinematography team covering Nassau County, Suffolk County and all five boroughs, and we have been photographing weddings here for over 25 years.